Good morning! It is almost the end of winter here and almost my favorite time of year-syrup time! Making maple syrup in our backyard is sooo much fun, I wish we had started sooner!
There are many reasons to produce your own maple syrup: to be more self-sufficient, to learn or try something new, to enjoy a fun family activity or even to just play with the campfire in the winter. But with only 2 maple trees, I never thought we could make maple syrup. I was wrong!
Our first few years, we had lots of questions. Through research and trial and error, we have learned so much about backyard maple syrup production. It is a continual learning process and there are different methods for the steps, but I’ll share with you what we have learned and what frugal methods work well for us.
Since this is a long article, feel free to click in the outline to jump to the specific spot you need or enjoy the whole article. I have included links to our maple syrup adventures in the post, but all the supplies you should need are here.
Trees for Syrup Production
Kinds of Trees
Many different types of trees can be used to make syrup. Some tree sap is poisonous though, like sumac and mulberry. Some trees also have poisonous parts, like elderberry stems and leaves. So, I would only recommend tapping trees known to have edible sap, like maple and birch. It is also good to identify your trees, so you know for sure if they are safe to tap.
Maple trees are most commonly used since they have a higher sugar concentration in the sap. Higher sugar concentration means less water to boil off before the syrup stage is reached. 2-3 % is a usually quoted average for sugar concentration in sugar maple and black maple trees, though it can vary greatly. The amount of sun, tree size and even time in the season can affect sugar ratios. One older (1940’s) New England study (this is a 21 page download from the University of Vermont-long but very interesting) found a range of 1.8%-8.4%, on the same day in the same town!
Other trees, like walnut, birch and hickory, can also be tapped to make edible syrup. There are differences to consider with different types of trees, though. The season for sap flow and collecting will be in the spring with the temperature fluctuations, but it may be slightly earlier or later in the year for other, non-maple, trees. Birch, for example, has a later and shorter season of sap flow.
The other, non-maple, trees also have a lower sugar ratio, so more water needs to be boiled off to make syrup. Birch, in addition to having a shorter season to collect sap, also has a lower sugar ratio at 1%. About 110 gallons of birch sap must be boiled to make 1 gallon of syrup, compared to 40 gallons of maple sap.
If you were collecting sap and producing syrup to sell, the sugar concentration in sap would be a huge consideration for which trees to tap. A lower sugar ratio would mean collecting more sap and boiling off more water, thus using more fuel, which would increase costs. But since we have only a small, backyard set-up and make syrup just for our family, I am happy to have any sugar ratio and to just get syrup.
Another consideration for non-maple trees is the rate of sap flow. If it is less, it will produce less sap to boil down. This could be a problem with the black walnut trees. While the sugar ratio and season for sap flow are similar to maple, black walnut trees produce at least 1/3 less sap.
Taste of the syrup would also be a consideration with different types of trees. I like the taste of maple syrup, but not the taste of black walnut meat. I’ve read that the syrup from black walnut sap doesn’t taste like black walnuts; it’s nutty tasting but not exactly like black walnuts. I don’t have any of these trees, so unfortunately I can’t tap them and find out. It would be fun, at least once to tap a birch, walnut, or hickory tree though.
In the maple family, sugar maples, and black maples have a higher concentration of sugar in sap, but all maple trees can be tapped to make maple syrup. I have never identified which maple type our trees are, but they make plenty of syrup for our use and even some to share! I enjoy making syrup so much; I would recommend trying a small, frugal set-up at least once, to anyone with a maple tree.
Number of Trees
I love watching YouTube videos of maple syrup production. All the tubing, evaporator pans, sugar shacks and acres of timber are amazing!
But we live in town and only have 2 maple trees. I never thought 2 trees would be enough, but it is!
We produce enough syrup for our family’s use and some to share. In fact, last year we had our best year ever- 11 quarts of syrup from 94 gallons of sap! Since we don’t eat a lot of pancakes or French toast, I started using maple syrup instead of brown sugar in my homemade granola. It is yummy and free!
More trees would be fun to tap, especially since I enjoy collecting and boiling down the sap to make syrup. But, I think even 1 or 2 trees would be worth tapping, especially if you do it frugally, like we do.
Since we didn’t know if we would like making maple syrup, we used frugal supplies our first year. Besides stock pots (not the best choice for evaporation, but I could use them other ways), our initial costs were under $50. I’ll talk more about keeping costs down in the boiling sap and supply sections, but wanted to let you know that maple syrup production can be done cheaply- especially the first few years until you know if you enjoy it and know what works for you.
Where
Typically, making maple syrup is thought of as a New England or Canadian activity. It makes sense; they are the largest producers of maple syrup. They also have a large population of sugar maple and black maple trees and the right climate for sap flow. Cold, below freezing, nights and warm, sunny days cause the sap to flow up and down the tree. If the tree is tapped, you can collect some of the sap to make maple syrup.
But maple and other tap-able trees grow all over the country.
Even though we had maple trees, I didn’t think tapping maple trees was possible here. Then, there was a local event to show the process of tapping maple trees. Wow! If they could do it locally, I figured we could also!
When researching, it was a surprise to find Michigan, Wisconsin and Minnesota also produce maple syrup! In fact, Michigan and Wisconsin are among the top 10 maple syrup producers in the world. The Iowa State Extension services even have a helpful section on their website about producing maple syrup.
Don’t be discouraged from trying backyard syrup production if you don’t live in a New England state or in Canada. If you have a few trees, enjoy the change of seasons and can keep your initial costs low (until you find out if you love it, like me) – it is worth a try! On a small, backyard scale, I would highly recommend trying to make your own syrup.
When to Tap Maple Trees
Though the type of maple tree (or other possible trees) you tap may vary and be flexible, the time of year is important. Unfortunately, it is not an exact definite date on the calendar.
I don’t like the guess work of when to tap, but as I learn more about it, I am getting more relaxed.
Basically, the days should be sunny and warm, in the 40’s and the nights should be below freezing. This helps pressures change in the trees and helps the sap freeze and thaw to flow up and down the tree. The sap flows to carry water and nutrients from the roots to the branches. If the tree is tapped, some sap will flow through the hole. It can then be collected and boiled down, concentrating the sugars to make syrup.
But still, when to tap is variable. Some producers watch the calendar and tap on the same date each year. This would make it soooo much easier, but you could miss potentially good sap flow days.
Once I called Iowa State extension service, in early February, asking about when to tap. The guy said they had a rule to not tap before Valentine’s Day. Had. That year the weather was ready, cold freezing nights and sunny days in late January and early February, so they experimented and got wonderful sap before Valentine’s Day. He told me to watch the weather and tap, tap, tap!
Even though it is guess work, I watch the extended forecast and look for 40’s daytime temperature and below 32 degrees at night. I watch for more than just one or two isolated days like this in the 10 day forecast.
I used to worry about tapping too early and then getting a week or two of only freezing weather. ‘Could the tap hole freeze up? Would it damage the tree?’ The extension service guy said it was fine- the trees would just enjoy a nap during the colder weather and then the sap would flow again as the weather warmed up.
The other problem with tapping too early is that the tap may dry out. It was a long held belief that after 6 weeks or so, the taps would dry out and start to heal back up. One 2008 University of Vermont report, suggests that it is not the exposure to air, but instead the introduction of bacteria (encouraged by warm weather) that slows sap flow in early taps. It was a very interesting study, showing an extended tap of 14 weeks still producing until the air temperatures increased. So while I don’t tap in early January, I watch the weather and would tap in late January if the conditions were right.
Of course, if you wait too long and then have a short spring, you could miss a large sap flow. I always worry about this, but getting the timing right is part of the fun. ‘Can we guess when to tap? Are we waiting too long?’ Thankfully, even though the weather is unpredictable and surprising, we always get some sap flow. And there is always next year to, again, guess the weather and guess when to tap.
Tapping the Trees
How Many Taps
After researching, preparing supplies and watching the weather temperatures, drilling is exiting! It is great to actually do something!
I’m a bit impatient, every year I think we have waited too long, that we have missed the sap flow. Then the husband drills into the trees, and the sap flows as he is taping a nylon hose barb into the tree!
It is so exciting to see the sap drip as we rush to put on the hose and collecting buckets! I think it’s so fun and exciting to see the sap start to flow. I’ve even had the kids come out to drill in pajamas and robes- it is so fun!
After agonizing over when to drill, the drilling itself is actually easy. Of course, I’m not doing the drilling-the husband is.
It is important to drill properly, since the sap carries water and nutrients to the branches. Depending on the tree size, too many taps could possibly hurt the tree or make it hard to find good tap-able spots in future years. Some maple farms have trees that have been safely tapped for generations, even over 100 years.
It would be easy to take a string or a sewing measuring tape outside to measure around the tree, a maple tree should be at least 10 inches in diameter before it is tapped. This would measure 31 ½ inches around the tree.
At 10 inches to 15 inches in diameter (32 inches to 47 inches around the tree), the tree can have 1 tap. A tree that is 16 inches to 20 inches in diameter (measuring 50 to 63 inches around) can have 2 taps. Trees larger than 21 inches in diameter (66 inches around) can have 3 taps, according to the Iowa State Extension Service.
I have read not to put in more than 3 taps, but I’ve also read to not put in more than 4 taps per tree. We can’t reach around our trees and touch our fingers, so we are being very safe and have only 2 taps on each of our 2 trees.
Since we are tapping the trees in our yard, for a fun family activity and we don’t sell any syrup, we are happy with just 4 taps altogether. We still make plenty of syrup for our use and even have some to share.
Where to Tap
Having spots to tap, that produce a good sap flow in future years, is a concern when deciding how many taps and where to locate the taps. While it is safe, drilling through the bark and into the sapwood layers does affect the tree. Previous taps cause staining in the sapwood. Staining is the small damaged area around a tap hole or other injury. It is thought to be minor for the tree, but sap flow is greatly reduced in that area.
The area around a drill hole will produce less sap in the future, so fresh holes need to be at least 2-3 inches to the side and at least 2-3 inches up or down from other drill holes. The new tap holes should not be in old tap holes. They also should not be directly above or below previous holes since the stained area goes at least 12 inches (and maybe up to 24 inches) above and below a tap.
Height of the tap can be what is comfortable for you and what works well for your collecting system.
Some producers go around the tree in the same direction every year to help them remember where they tapped and to stay away from previous tap holes.
How to Tap
Drilling into a frozen trunk might split the wood, so we drill and tap on warmer days. The husband uses a cordless drill and a 3/8 inch drill bit, since our taps are 3/8 inch nylon hose barbs. We get them at a local home improvement store, in the plumbing department and they only cost about $1.50. Some year, we may go down to a 5/16 stainless steel size tap so we can reuse them.
Traditional spiles or taps were 7/16 inches, so 7/16 inch drill bits were used. In the 1990’s ‘healthy’ 5/16 inch taps started to be used. There was thought that the smaller drilling size was better for the tree, but possibly reduced the amount of sap gathered. Since we don’t commercially produce syrup, it is fine to with possibly get less sap, especially if it is healthier for the maple tree. A Proctor Maple Research study(7 page download), from the University of Vermont, studied wood damage and sap production from the 2 different sized taps. The 1998-2002 research did show much less staining (damaged area) to the trees, with not too much reduction in sap gathered. So, I am glad we are using smaller taps.
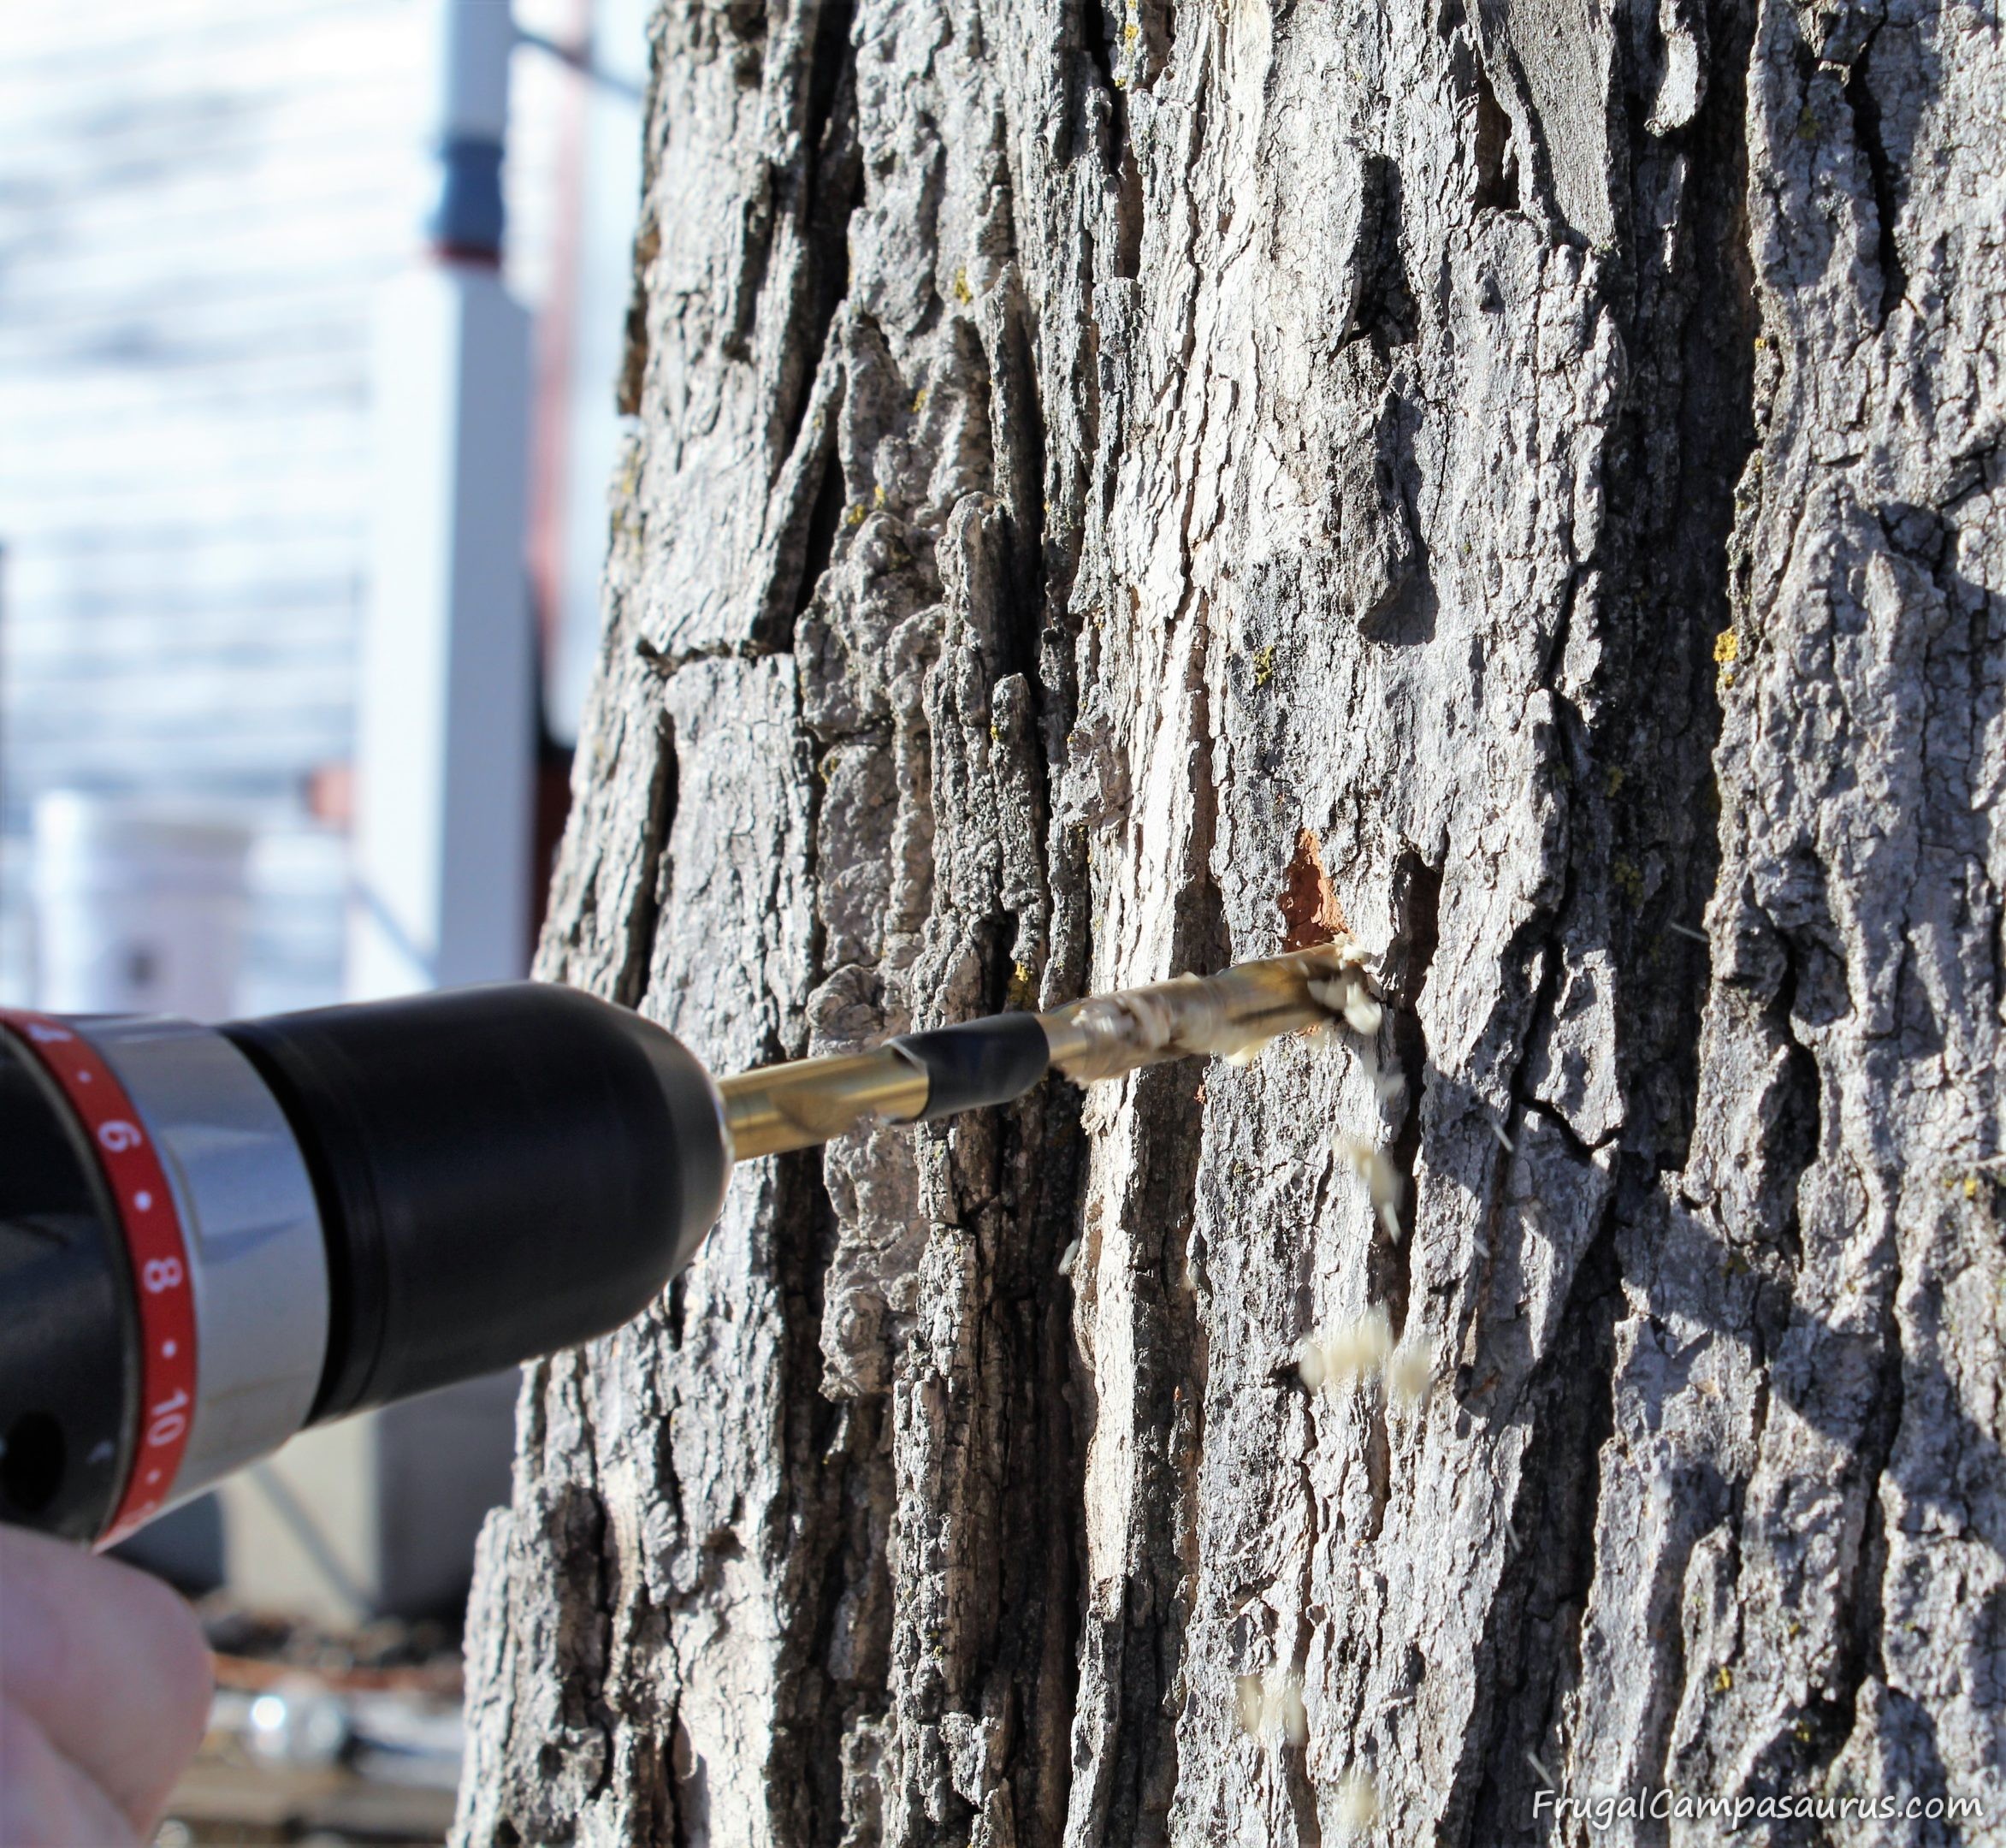
He drills through the bark and into the sapwood about 2 inches in depth. Putting tape around the drill bit at 2 inches helps mark how deep to go. Sometimes if the bark is really thick, he will drill a bit deeper. Drill at a slight upwards angle so the sap can easily flow out.
The wood shavings from drilling should be light brown/white in color, which is healthy sapwood. If they are dark, the tap could be in a damaged or stained area which will produce little sap flow. You can move to a new spot to drill.
Push the tap in by hand, and then lightly tap it in with a hammer to set it. You want it snug, so the sap doesn’t leak. Don’t pound it in hard though, as that might cause the wood to split and it makes it harder to pull the tap out at the end of the season.
Collecting Sap
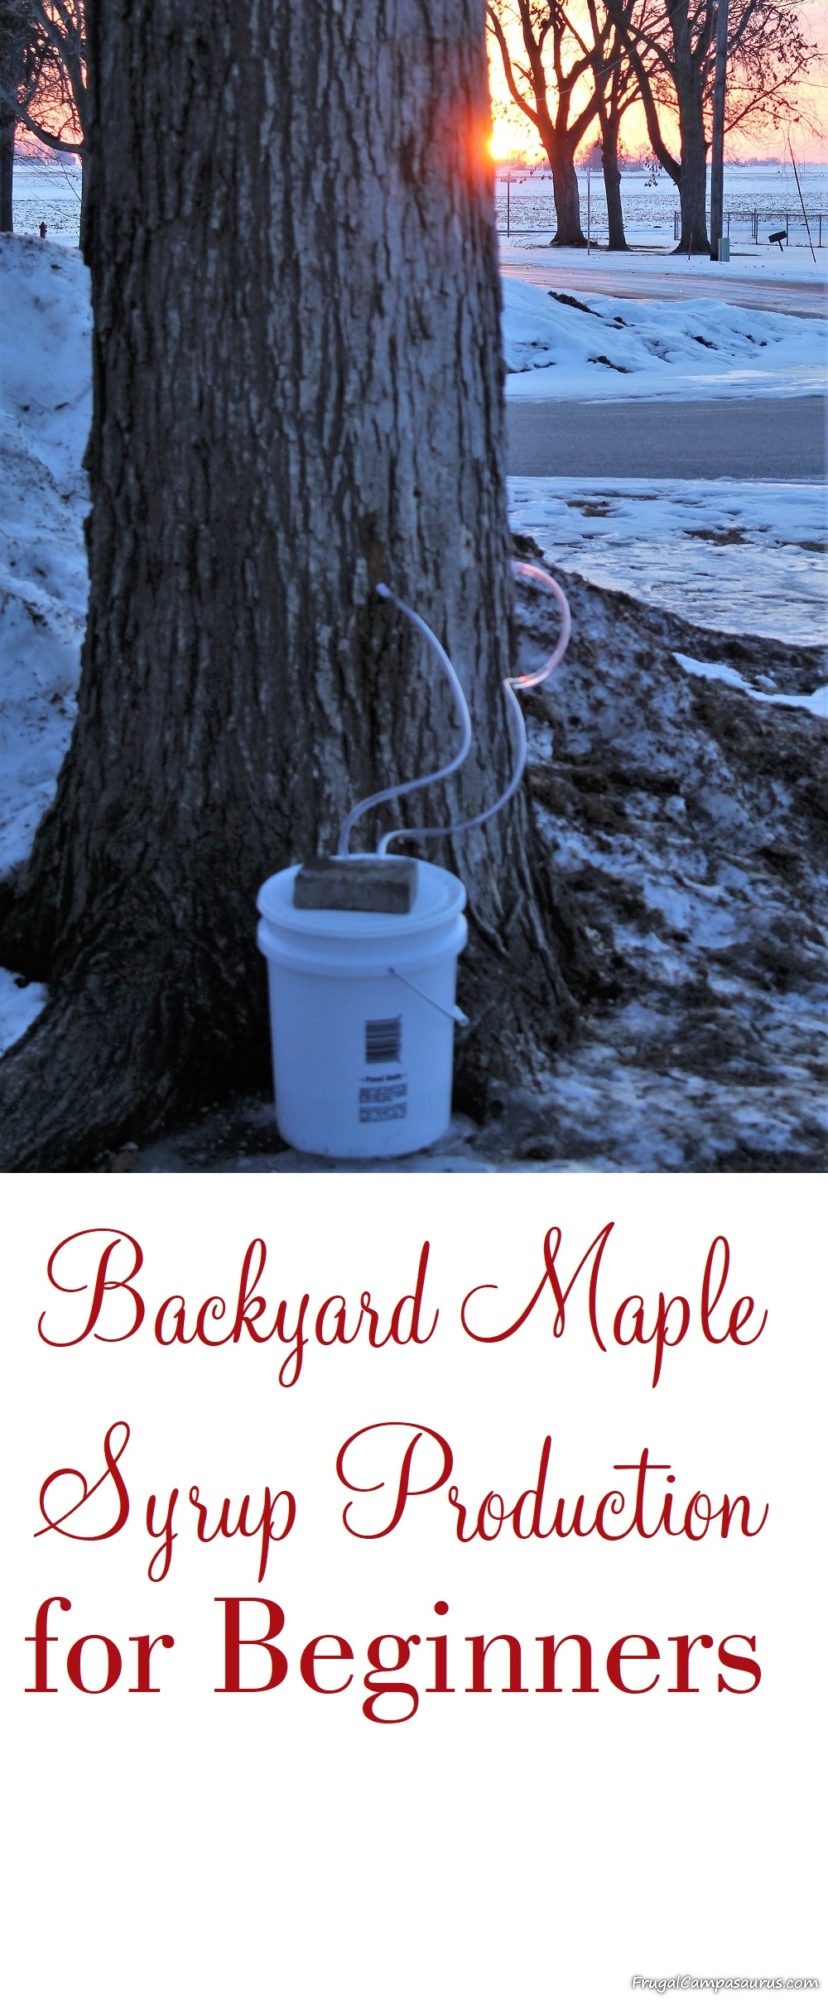
We don’t hang buckets from the taps; our frugal hose barbs wouldn’t hold the weight. But it is easy to attach a food grade plastic hose to the hose barb and run it into a bucket that sits on the ground. Local delis and bakeries may have free or cheap plastic buckets with lids, some of ours were free and some were $1. Many home improvement stores also have food grade buckets. I’ve seen some 5 gallon ones for around $5, not free but still cheap.
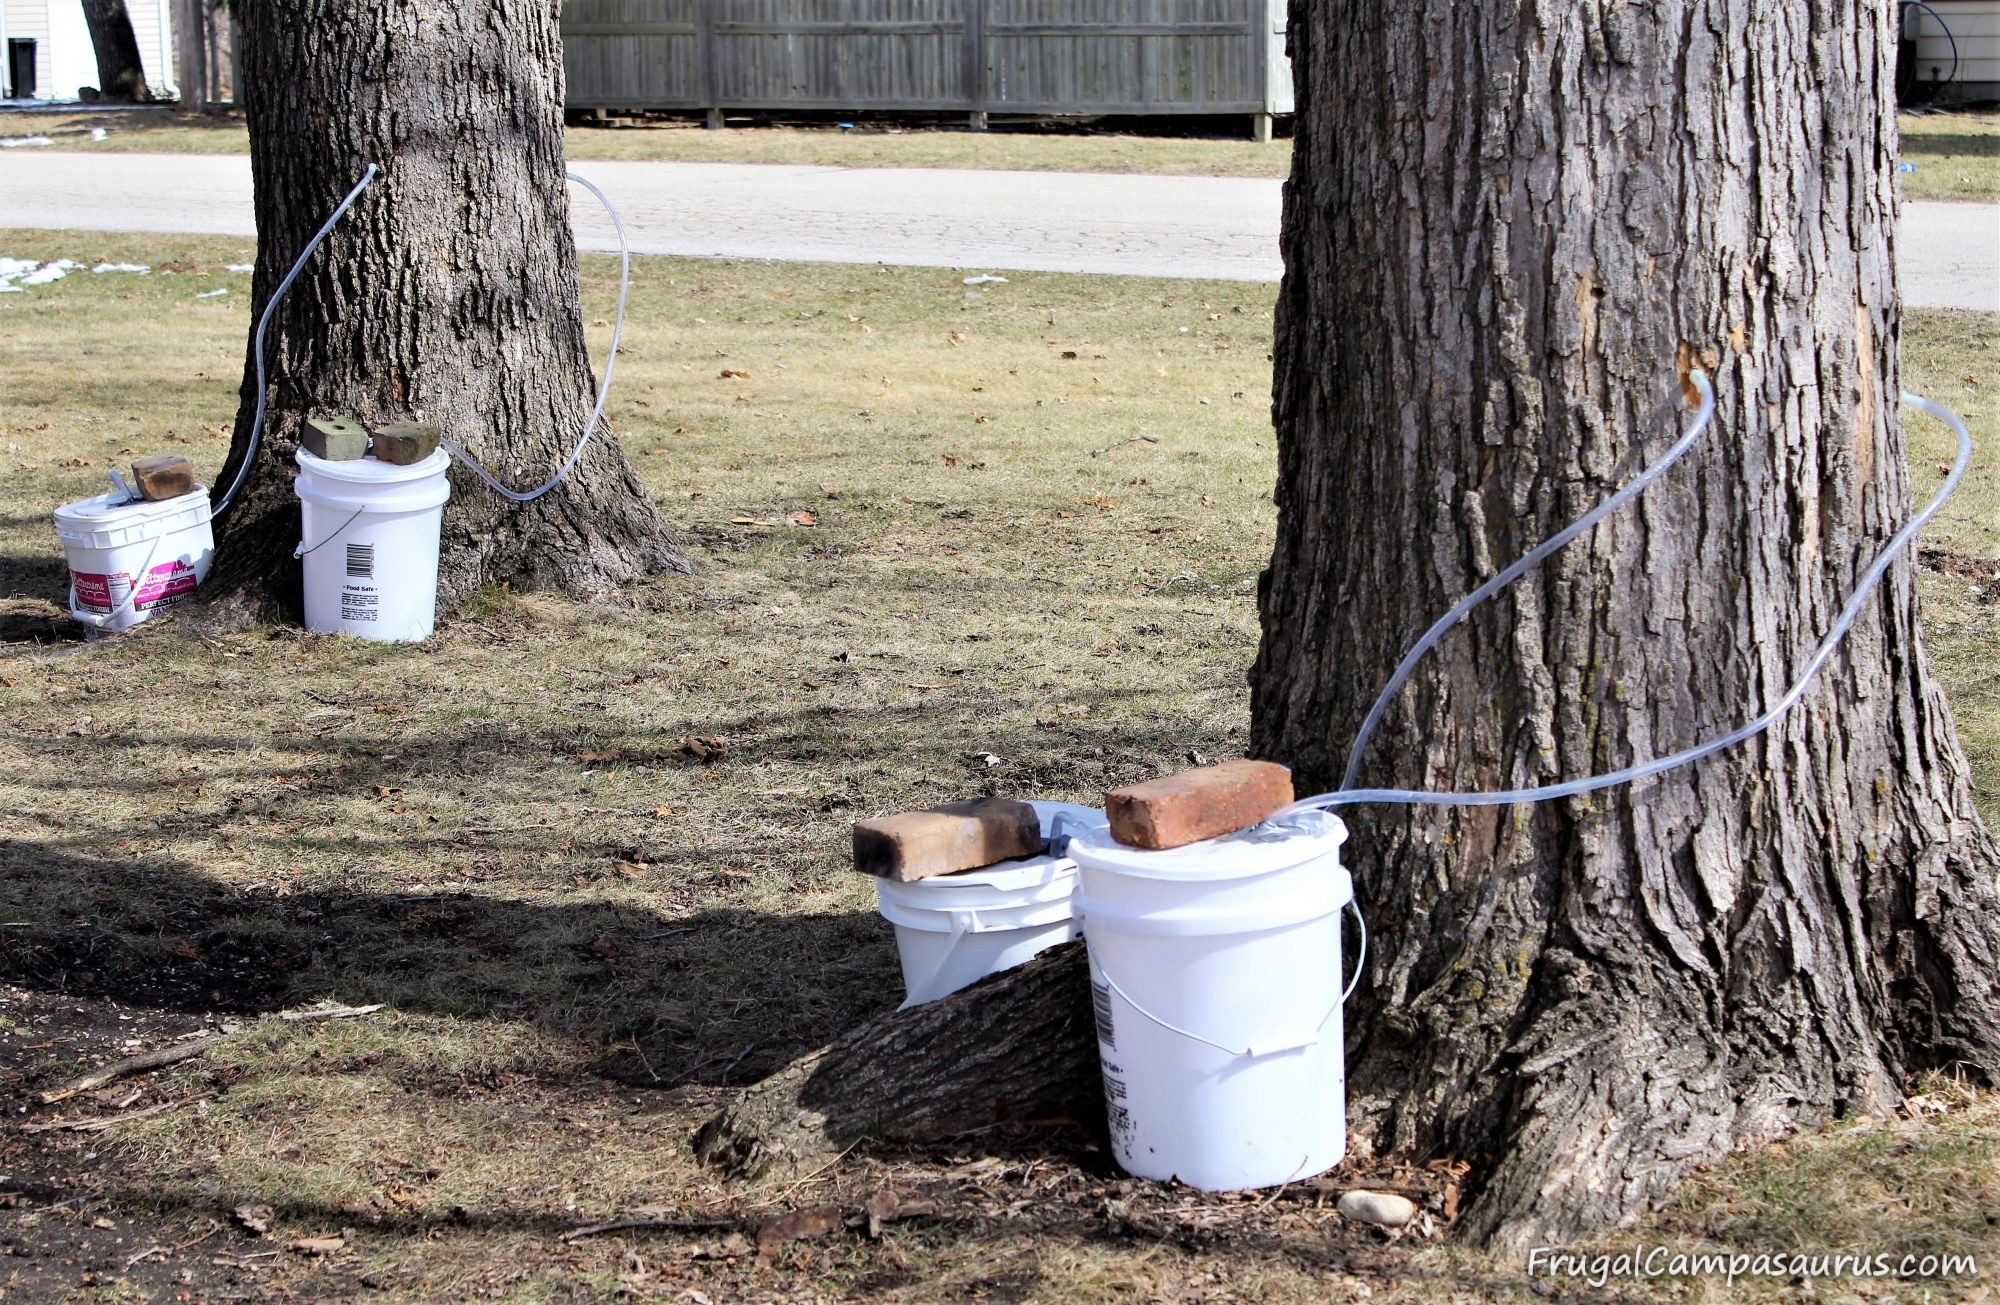
The husband drilled holes into the bucket lids for the hose. Setting the bucket on a slant will keep any rain from going in the hole in the lid.
If we ever need new buckets, the husband is going to drill the holes right into the bucket, near the top edge. Then, rain water and dust from the lid wouldn’t get inside the bucket. We also set a brick on top of the bucket, so it doesn’t blow away in the wind.
The first few years, we had one bucket for each tap. That was fine and the buckets never over flowed, but the lids were hard to take off with my sore elbow. Now, we have one bucket for each tree, with 2 hoses going to each bucket.
Storing Sap
Since I like to check for sap a few times a day, 2 hoses in each bucket has not been a problem. On cold days, there might not be any sap dripping down the lines. Some days though, I’m surprised. On good sap flow days, the buckets can get very full.
Sap is perishable, like milk, so length of storage time and temperature affect it. It is important to keep it cool, so it doesn’t spoil and become cloudy and off smelling. If the temperatures are right for sap flow, with freezing nights and warmer days, I make sure to check the sap buckets often.
On cold days, I leave the sap in the buckets for 1 or 2 days. Sometimes it even freezes in the bucket. That’s ok, at least I know it is cold enough to not spoil.
On warmer days though, I empty the buckets and store the sap somewhere cool since sap spoils faster in warmer temperatures. We use rinsed out milk jugs to store the sap. A large funnel makes it easy to pour the sap from the bucket to the milk jug. I have used stock pots, jars and Kool-aide pitchers though, when the sap is really flowing and I have forgotten to save enough milk jugs.
We try to keep the refrigerator emptier during syrup season, so the gallons of sap can go in there during the week. With the kids though, it is usually full of milk.
Early in the season, it is easy to bury the milk jugs of sap in a snowbank.
I have also put almost full gallons of sap into the freezer. Make sure to leave a few inches at the top of the gallon for the sap to expand as it freezes. I’ve read that an igloo or clean cooler will work to store sap. Frozen chunks of sap are added to keep it cool. I haven’t tried this yet, though I may this year.
The husband keeps saying to use the camper refrigerator, but it doesn’t sound frugal to turn on the camper to store sap.
Like milk, sap doesn’t keep forever. It will last about a week, if kept cool. We try to boil every weekend, though sometimes we have too much sap to store. Then, I boil the sap by myself during the week. It is not hard, just quieter without the husband to help.
A Michigan State University extension service article says that you can partially boil down the sap. Then, you could cool it down and store it in the refrigerator until you have enough to finish it as syrup. I like this idea, but haven’t tried it yet. Of course, partially boiling it would still mean cooking outside for a few hours to evaporate part of the water off.
Processing Sap
Boiling Sap
Once you have tapped the trees and collected and stored sap, it’s time to cook the sap to make syrup!
It is important to have enough sap to boil, since so much water needs to be evaporated off when making maple syrup. Maple sap is about 2 % sugar concentration and syrup needs to be about 66% sugar concentration. So 40 gallons of sap will boil down to roughly one gallon of syrup depending upon the sugar concentration in the sap.
This means that 39 gallons of water needs to evaporate. The first time we tapped our 2 maple trees, I was so excited and brought in a small saucepan of sap on the very first night. I couldn’t wait to boil it on the stove.
Would I really get syrup? Of course I did, but only about a tablespoon. With such small amount, I scorched it. But it was sweet and it was from our trees! We’ve been hooked on making maple syrup ever since.
Now, we try to have about 15 to 20 gallons of sap when we boil. It is not such a small amount that I will scorch it, but it is also not so much that we are boiling until midnight!
1st Boil – Outside Cookers
Since sooo much water needs to boil off (about 39 gallons for 1 gallon of syrup), making maple syrup produces a lot of steam! It can also be an all-day process, so we do the majority of our boiling outside. It’s fun tending and watching the fire as the sap boils. It would be expensive to boil all the sap inside on the stove all day. Filling the kitchen with steam and moisture would not be good for the kitchen walls or paint either.
To stay frugal, we burn wood outside to heat the sap. Some people use propane outside, so the steam is not in the house, but propane can be expensive. Our wood is free, but it can take a lot of wood. One year, we used all of our wood for camping! Now, we plan for maple syrup fires and split more wood during the summer.
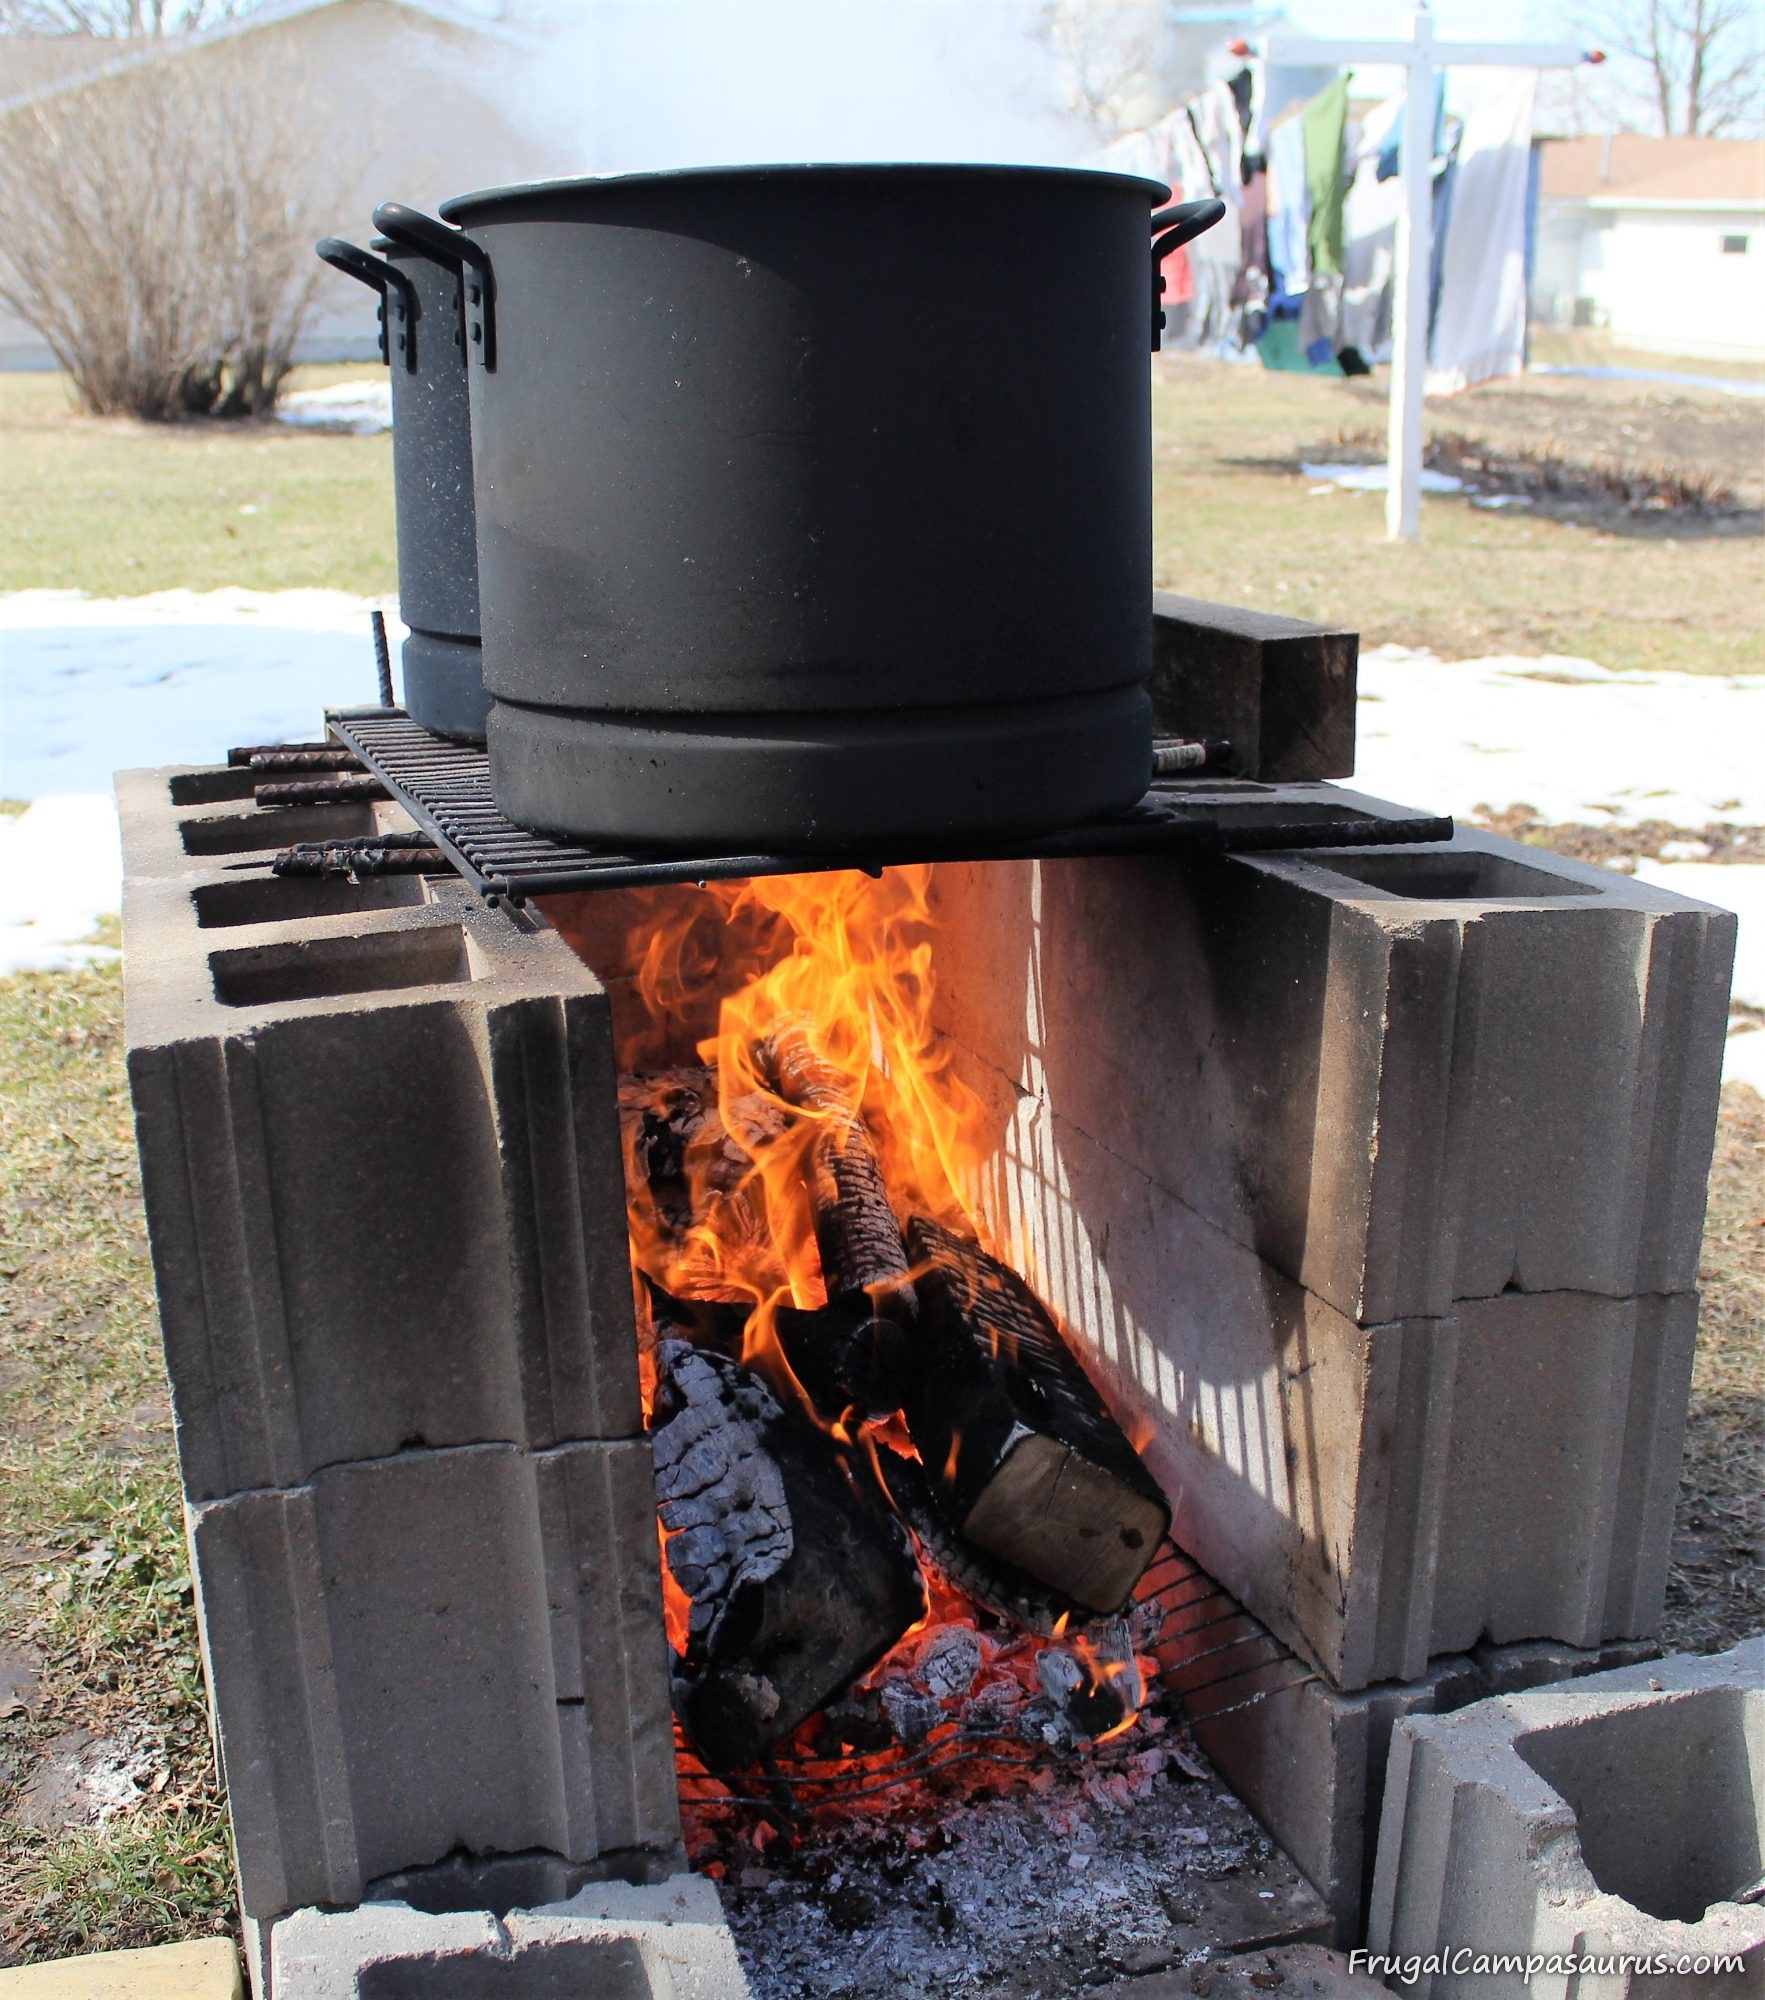
Our concrete block cooker worked fine for the first few years. We wanted to keep costs low, since we didn’t know if we would enjoy making maple syrup or if we would get enough sap from our 2 trees.
Concrete blocks are about $1 each and we used about 20 of them to build a 3-sided cooker. The fire burns inside, protected from the wind, and 2 old grill grates, supported by thicker rebar, rest on the top.
Thankfully, the concrete blocks are cheap. They are not made for heat, so most of them cracked by the end of the first maple syrup season. Maybe filling them with sand or dirt would help them not crack, but we didn’t fill them because we move the cooker when the season is over.
We used 2 stock pots to boil the sap in, on the concrete block cooker. They sat on 2 old grill grates, which worked fine- but the round shape of the pots lets a lot of the heat escape. It went well, but boiling the sap took all day and the syrup had a smoky flavor. Some of us like the smoky flavor from the wood (me,me!!) but some of us didn’t and burning even untreated 4x4s caused a bitter flavor in a few batches.
I’m glad we started with the concrete block cooker, though. Since it was cheap, I didn’t worry about wasting much money. We were able to just start making maple syrup, and not fret over which equipment to buy.
After a few years, we decided that deep, rectangle restaurant steamer pans would better use the heat. A barrel cooker would also last longer than our concrete block cooker.
I thought we would wait for sales to change our equipment, but I was super surprised at my Christmas present 2 years ago: 2 rectangle steamer pans and a barrel cooker! I couldn’t believe the husband had made one without me knowing it!
It was hard to wait to use my Christmas presents until maple syrup time! Thankfully, we needed to burn off the used barrel, so I could try it during Christmas break!
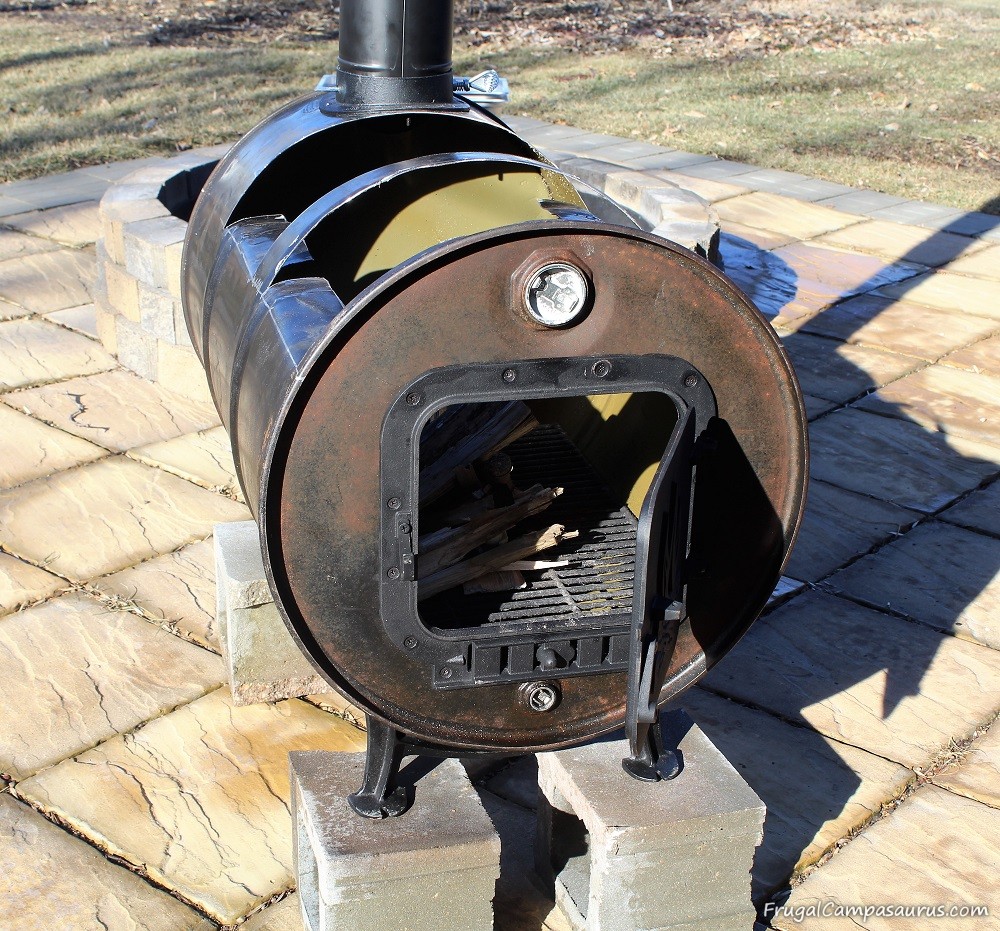
While our 1st set up worked great and made yummy maple syrup, the steamer pans and barrel cooker were a more efficient use of our heat. The 1st time we used it to make maple syrup was quicker than before!
We started boiling later in the day than normal – 2:30, but we finished about 7:30, a little earlier than normal! And I only boiled for 10 minutes inside; sometimes I would boil for an hour inside.
The steamer pans hold a different amount than our stock pots (of course), so I wasn’t sure when to filter and take the partially cooked sap inside to finish. I almost waited too long, but at least I didn’t scorch it!
Cooking Sap
First, according to how much sap you have, decide at what liquid level you want to go inside to finish boiling your sap. Then, measure it to see how it looks in your outside pans.
I have a smaller porcelain stock pot (7-8 quarts) that I like to finish boiling the syrup in inside, it boils 5 quarts comfortably. Since we try to boil with 15-20 gallons of sap, we should finish with about 2 quarts of syrup. I am safe to bring it inside at the 4-5 quart level. I know it won’t be scorched and it fits into my pot.
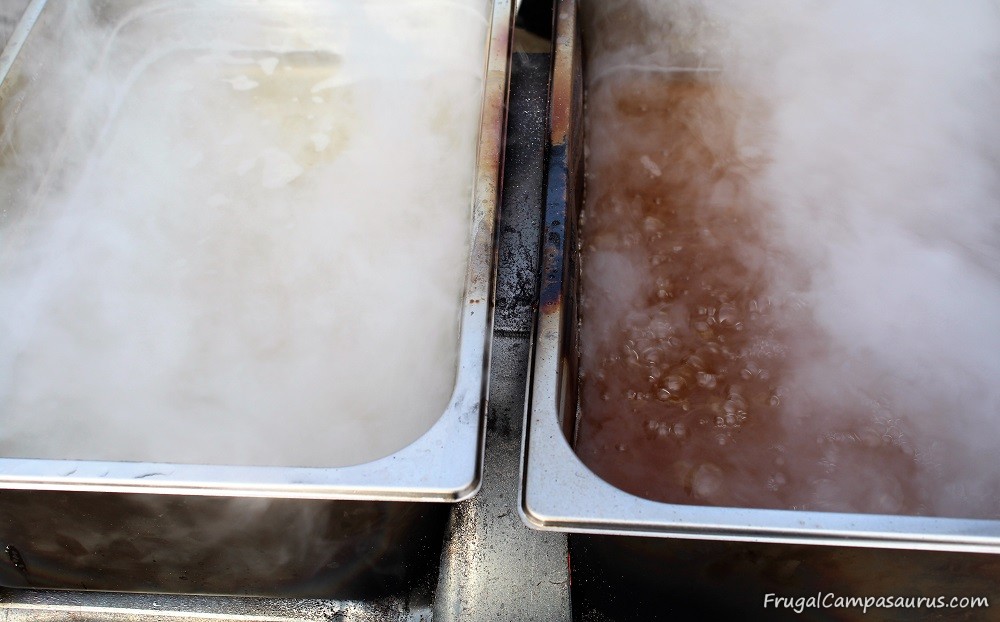
With both cookers, we use the same 2 pot method for boiling sap and finishing the syrup.
After the fire is started, 2 pans are filled ½-2/3 full with cold sap and brought to a boil. After this, we treat the 2 pans differently: 1 is the preheat pan and 1 is not.
Cold sap only goes in the preheat pan, so the other pan can stay at a constant boil and evaporate faster. When first boiling, the sap in both pans will be clear like water and not really sweet tasting. In Korea, the sap is a traditional spring drink. It does contain vitamins and minerals. We have tasted it after boiling it for 10 minutes to pasteurize it, but it doesn’t have much flavor. I’d rather drink coffee and make maple syrup.
As it boils down and the water evaporates off, hot sap from the preheat pan is added to the ‘hot only’ pan. I use a small sauce pan to transfer it. With the stock pots, the husband would pick one up and pour it into the other, but I worried about the flames.
More cold sap is added to the preheat pan then, to keep the sap levels about ½-2/3 full.
The goal is to keep the sap boiling, so it can quickly evaporate the excess water and reduce down to syrup. Unfortunately for the husband- I like to stir and mess with it.
Stirring slows down the boil, but I tell him ‘I don’t want it to burn’ or ‘I’m looking for floaties to skim out.’
The husband doesn’t usually believe me. When it’s thin, the sap won’t burn in the pan unless the level gets too low.
It is important to get floaties out, though. On our more open, concrete block cooker, ash from the fire would blow into the pot. The ash needs to get skimmed out with a slotted spoon or a fine mesh strainer, so it doesn’t leave a bad taste.
With the barrel cooker, we get more floaties from scorching on the side of the pan.
As the sap boils, I think some burns onto the side of the pan, especially between the 2 pans in the middle of the barrel cooker where the flames get high.
This year, the husband is going to try a steel piece between the steamer pans, to help reduce the scorched sides. Or we might have smaller fires. Maple syrup is a constant learning process, and it’s fun trying different things to figure out what works best.
Both pans should boil vigorously, so don’t overfill the pans. The boiling will make foam, which also needs to be skimmed off. Otherwise, it boils over easier.
If a pan gets close to boiling over, we stir it to reduce the boil. Moving the logs to reduce the heat also helps. I’ve read about adding a small pat of butter or non-dairy creamer to the sap, but we have never tried it.
The sap in the hot only pan will become golden and sweeter as you are able to evaporate the water, add more partially boiled sap and increase the sugar concentration.
It is fun to watch the fire and tend the sap pans, but it can be an all-day process. The amount of sap to reduce, the wind and the weather can all affect how long it will take. If you watch the pan levels and skim off foam, there is plenty of time to do some spring yard work, enjoy the sun, empty more sap buckets or even nap!
Eventually you will run out of cold sap to add, though we always have more to add from the trees that day. As the sap levels get lower, we combine it into 1 pan and continue to boil outside.
It can be hard to wait to take it inside. But our wood is free, and I don’t like boiling an hour or more on the kitchen stove, so I try to boil outside as long as possible.
The prep work of measuring before boiling is really helpful now. It is great to know (not just guess) when to go inside and finish making maple syrup.
2nd Boiling ‘Almost Syrup’ Goes Inside
Since we usually boil 15-20 gallons of sap, we should get around 2 quarts of syrup. I try to go inside at the 4 quart level. I’ll still need to boil inside, but I won’t scorch it. I would rather play with fire and boil outside, the wood is free and it boils faster. But the steamer pan evaporates off the water quickly with the larger surface area, so I’m afraid of boiling it past the syrup point and burning the maple syrup.

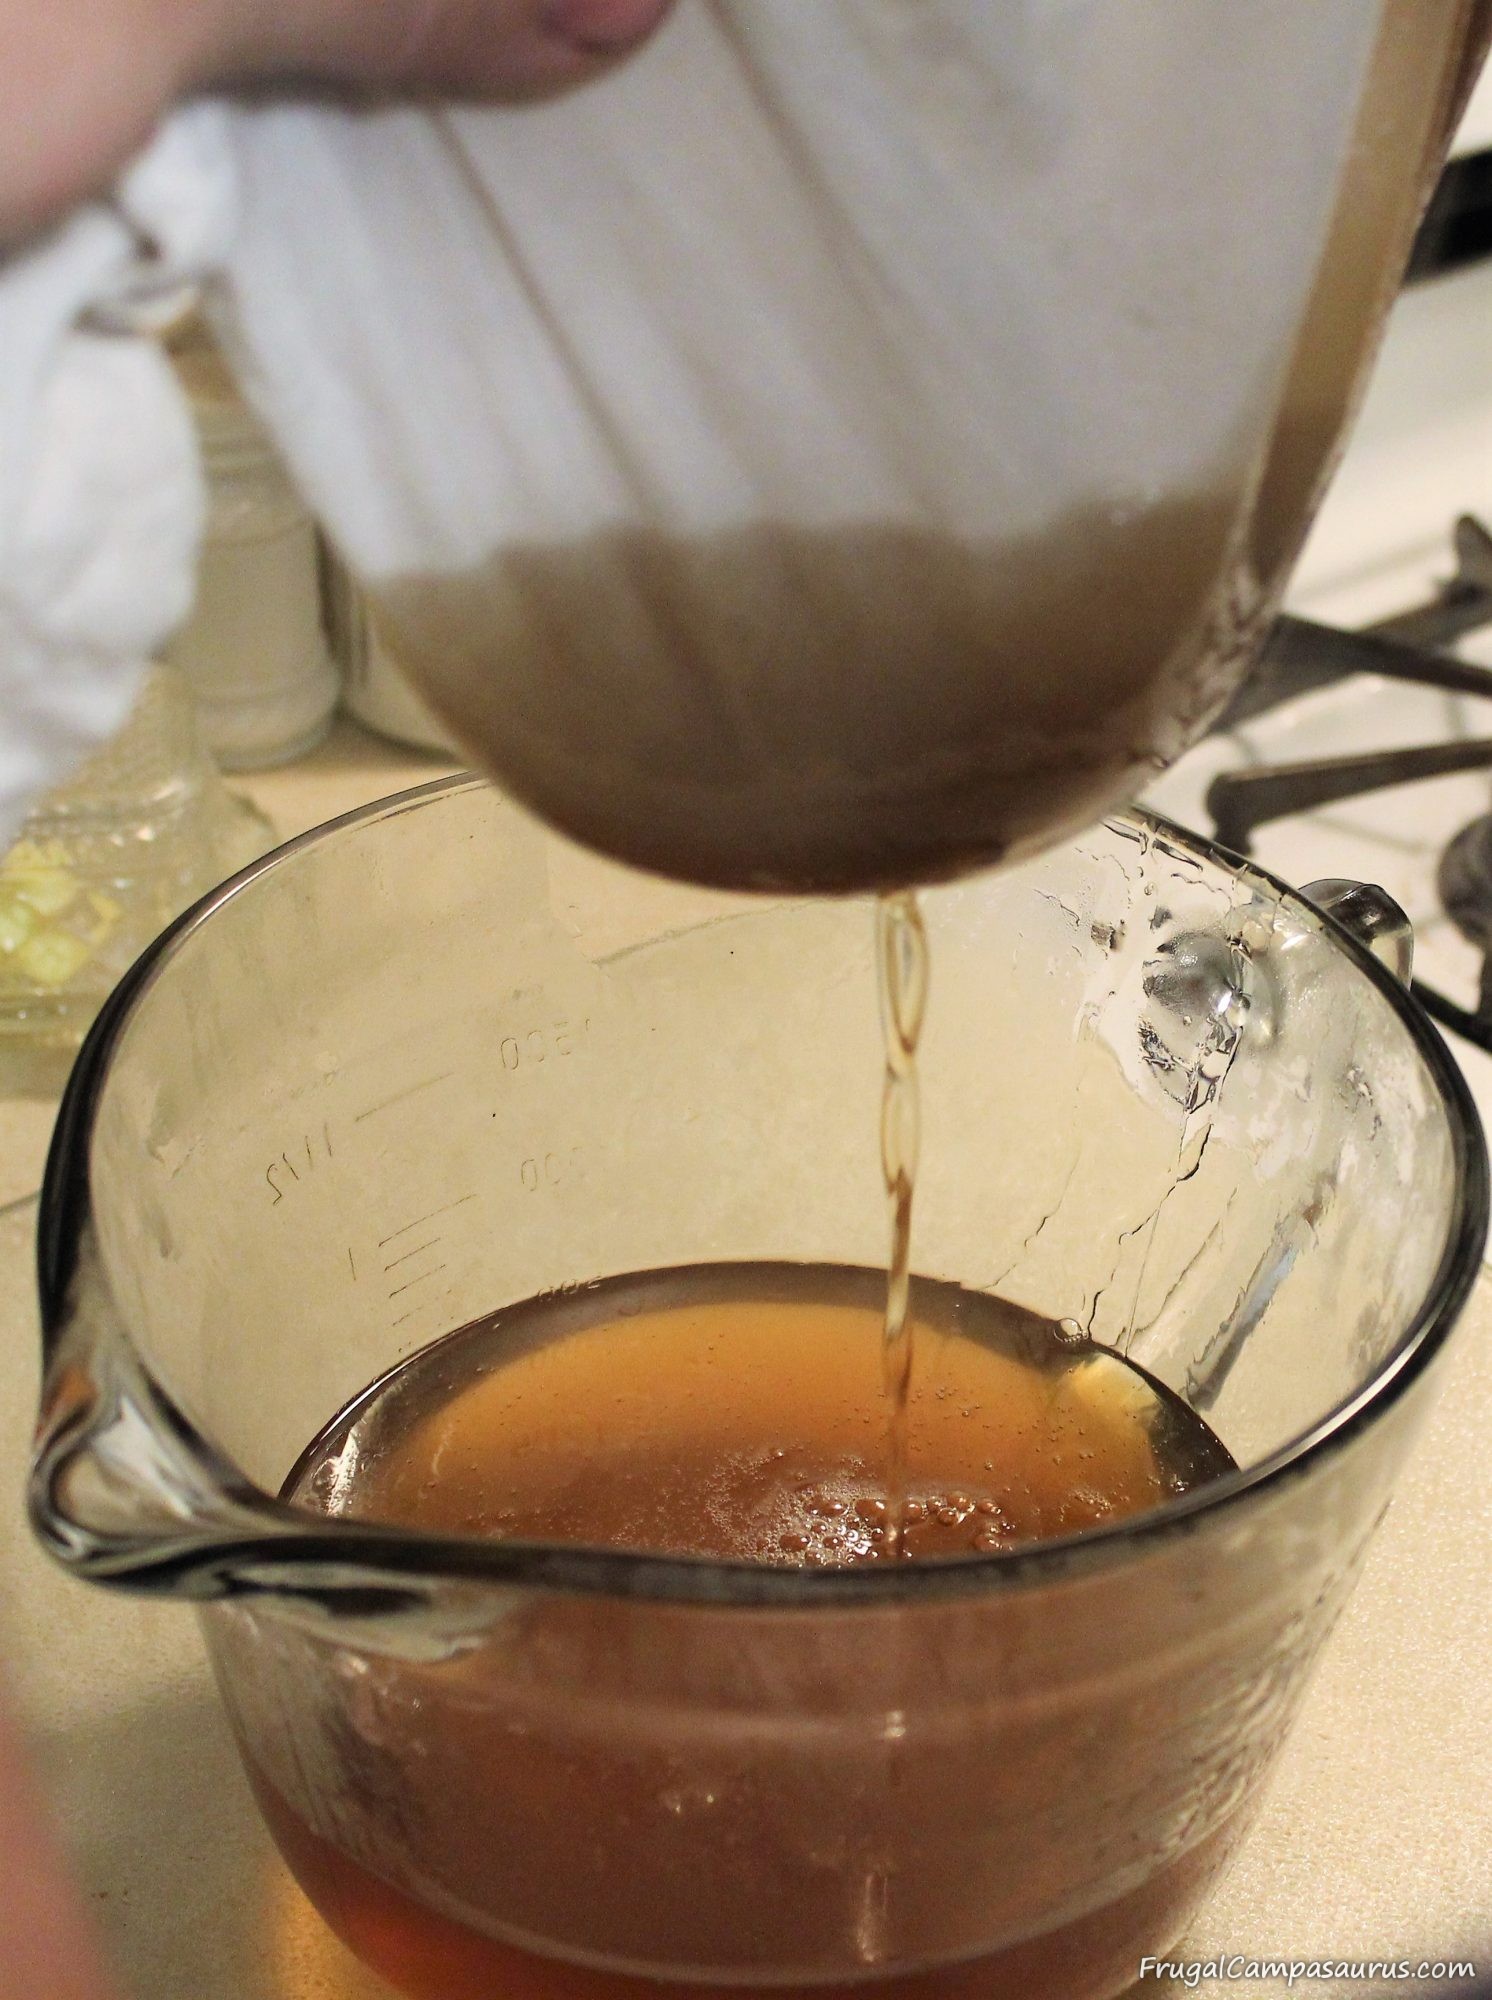
Before we finally go inside, we do the 1st of 2 filterings. The almost syrup is poured into my smaller (7-8 quart) stock pot through a clean tea towel. At this stage, it will pour through the towel easily, just catching any foam or ash from the fire.
The sap is boiling hot though, so we lay the towel into the pot. Then we pour the sap into the pot. As we hold the corners and lift the towel out, the sap flows through (staying in the pot) and the ash stays on the towel. We do not try to hold the towel, while the other person is pouring.
We tried using coffee filters, but they were small and clogged. You can buy special filters, but using a clean cotton tea towel is a great frugal alternative.
After the 1st filtering, we continue to boil the sap inside, on the stove. The sap runs off the spoon, even after condensing from 17 1/2 gallons to 4-5 quarts. It still flows like water-definitely not syrup yet.
Since it usually needs to boil for a little while inside, I have time to quickly wash the sooty stock pots or steamer pans. The sooty pans do not come inside the house! I take a pan of warm water with a little Dawn dish soap outside and wash the inside of the pans, then I rinse a few times and dry them on the embers. Even if it is dark, it’s easier to wash them right away before the sweet, sticky sap dries and hardens. I don’t worry about scrubbing the soot off the outside of the pans yet. Once in a while, I will wipe the soot off with a rag-but I wait to scrub them until the end of the season.
Becoming Syrup
Inside the house, now on the stove, the sap continues to boil and evaporate water. I put my candy thermometer in now, so I can watch the temperature. As it gets closer to the syrup stage, the drips from the spoon are single drops that get sticky looking and slower. The boil also gets foamier, with tiny, tiny bubbles.
Finally, the drops will stick together and seem to want to stay on the spoon. They will also ‘apron’ or come off the spoon wider, like a sheet instead of a drop. I love watching the progression of drops, but it can be distracting and cause me to go right past the syrup stage, causing sugar crystals in the bottom of the finished jars.
It becomes maple syrup at about 7 degrees above the boiling point of water, so roughly 219 degrees. The weather and air pressure affects the boiling point of water, so using a thermometer is not as exact. Our syrup is only for at-home use; we don’t sell or bottle it, so we don’t use a hydrometer. The hydrometer would be more exact since it measures the amount of sugar in the maple syrup, but it is more expensive. We don’t need to be as exact since we don’t can our maple syrup; we store it in the freezer.
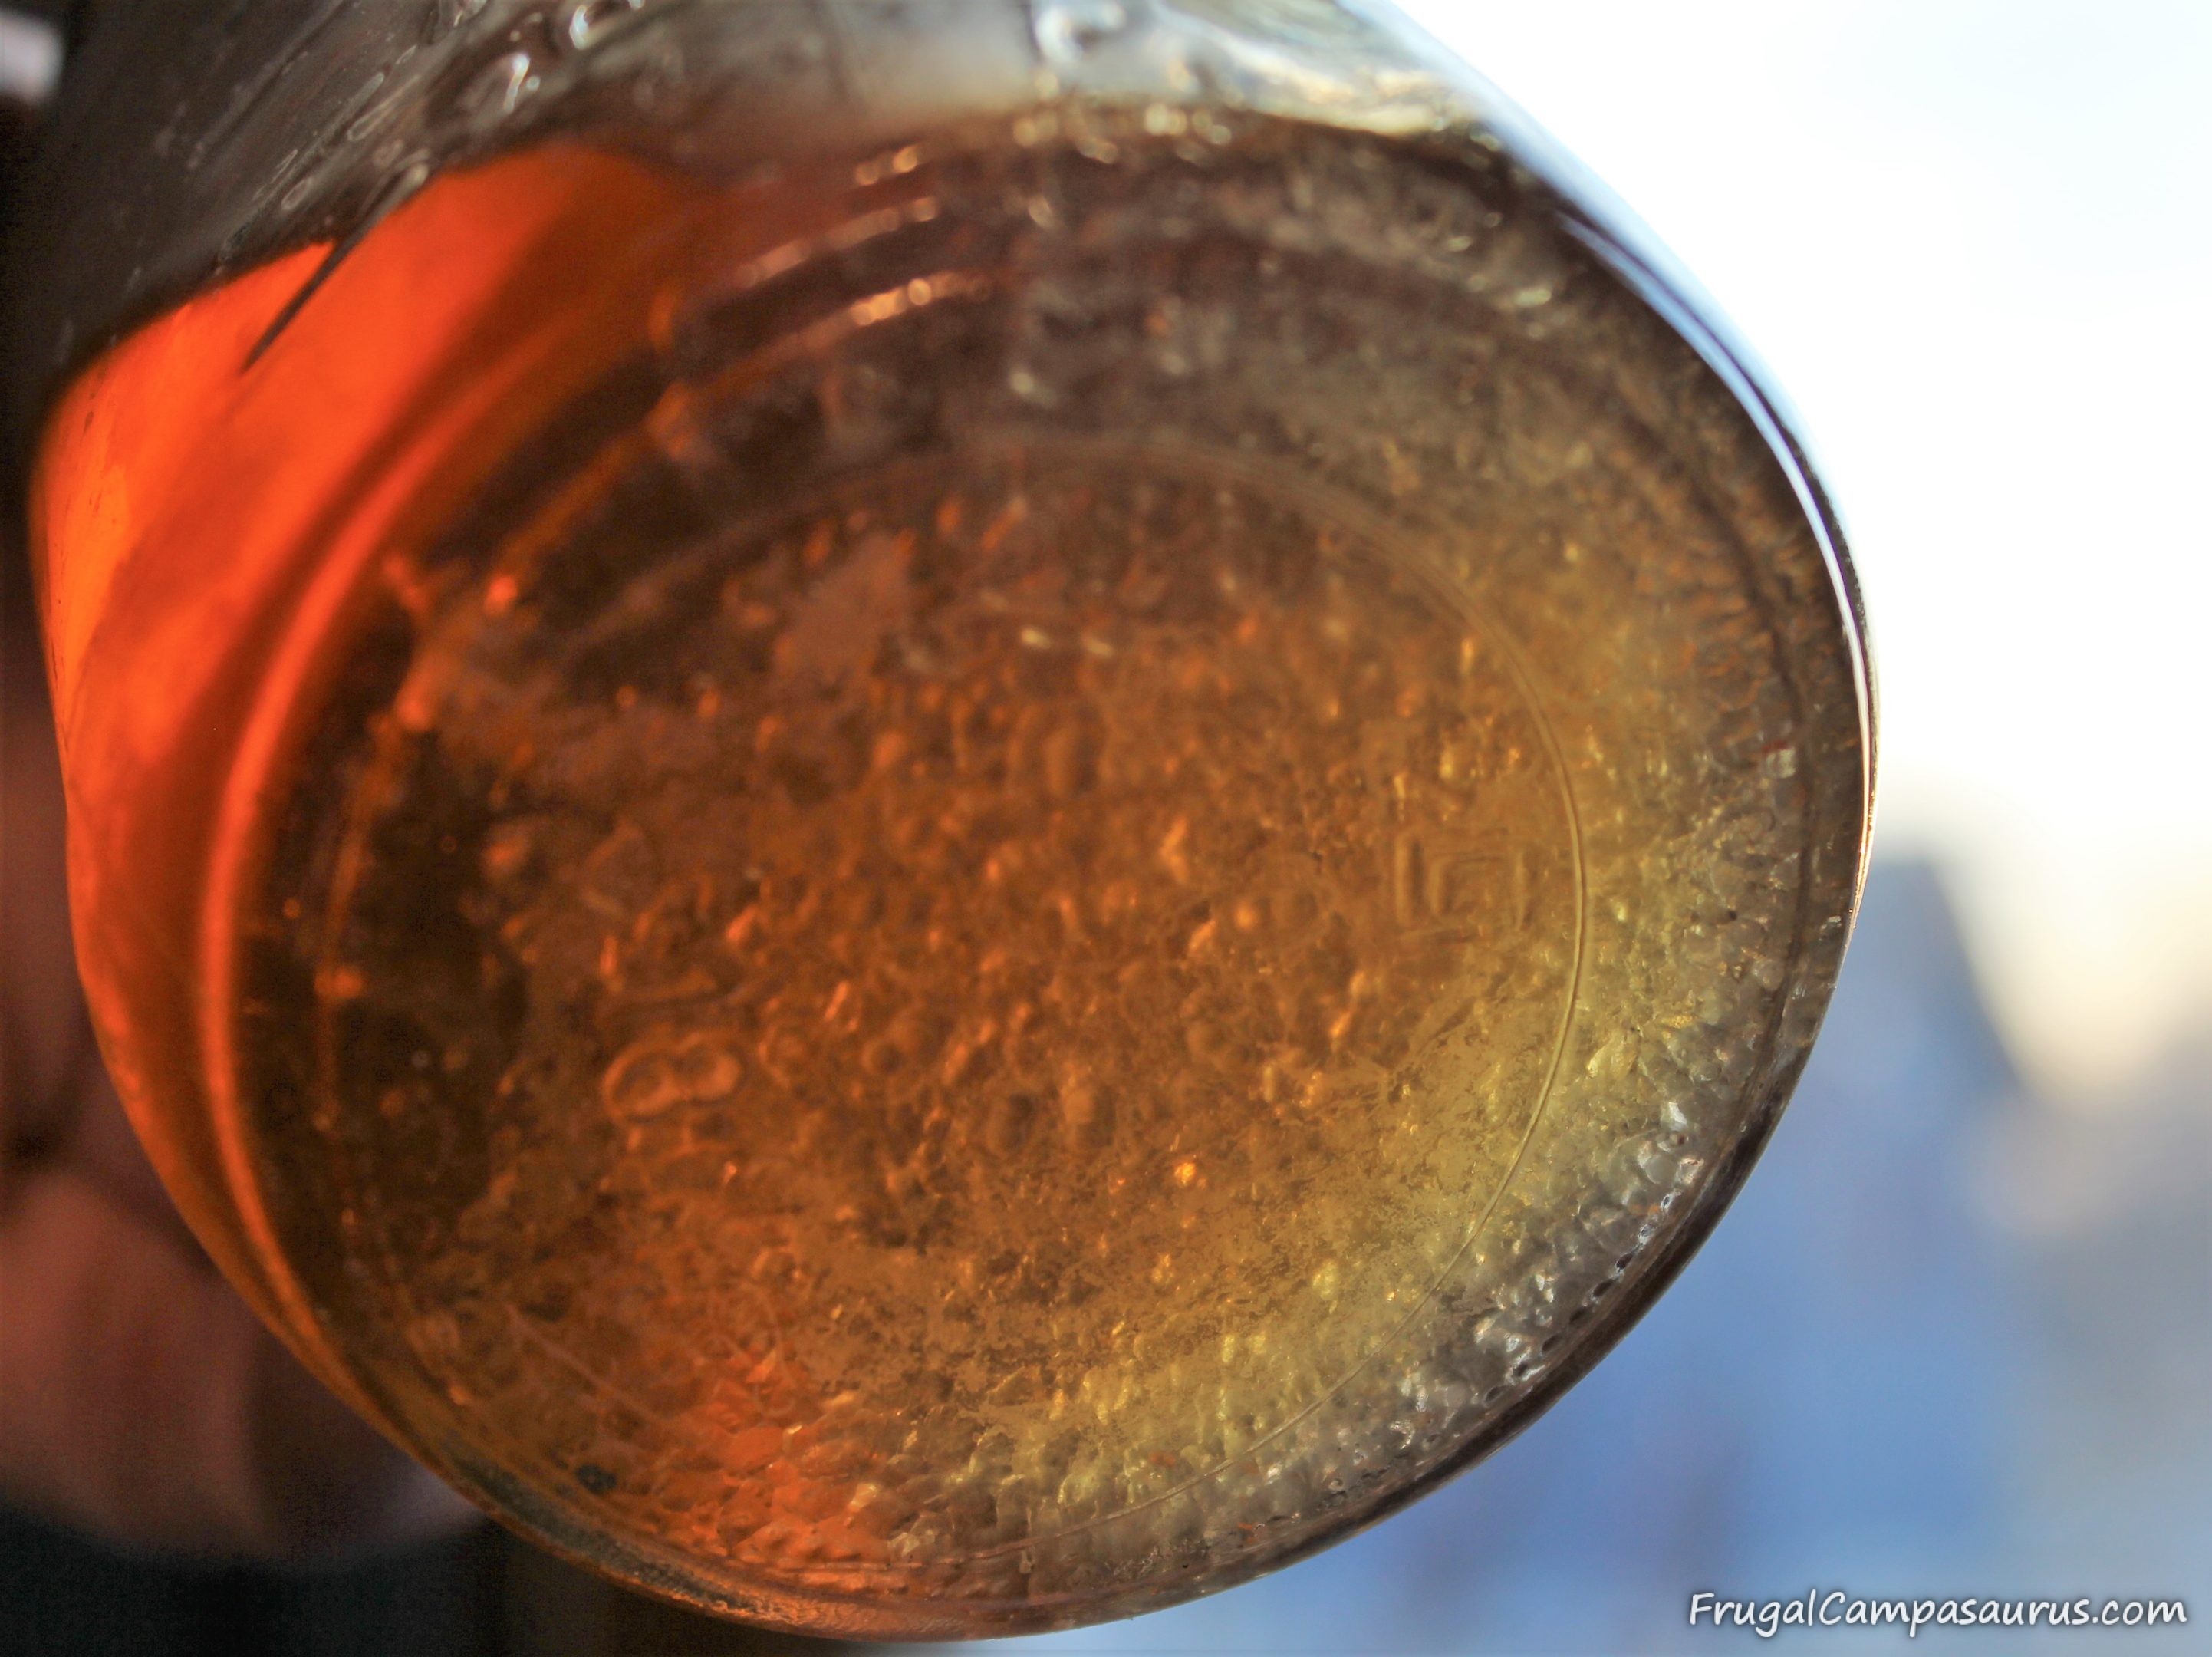
When it reaches the syrup point, we filter it for the 2nd time. We use a second, clean cotton tea towel to filter. This removes the sugar sand (niter) before cooling and storing the syrup.
The sugar sand is gritty sediment that forms from the trace minerals when the sap is condensed. It stays in the cotton dishtowel while the syrup goes through; we rinse the sand down the sink when we’re done filtering.
The second filtering needs to be done right away, while the syrup is very hot- so be very careful! If the syrup starts cooling, it will not filter through the towel, even if there is little sugar sand to block it.
We lay the cotton tea towel in a 4 quart glass measuring cup to do the second filtering. Then, we pour the maple syrup into the measuring cup. As we lift the tea towel by the corners, the maple syrup flows through the towel and the sugar sand does not.
Sometimes, there is a lot of sugar sand. It can clog the tea towel, so we tilt the towel carefully allowing the syrup flows through a clean area. Even the steam from the hot syrup can be dangerous as you are moving the towel, so it’s helpful to have 2 people do this step together. A metal canning strainer with a stand might help hold the towel while the syrup filters, but I have not tried it yet to see if it works.
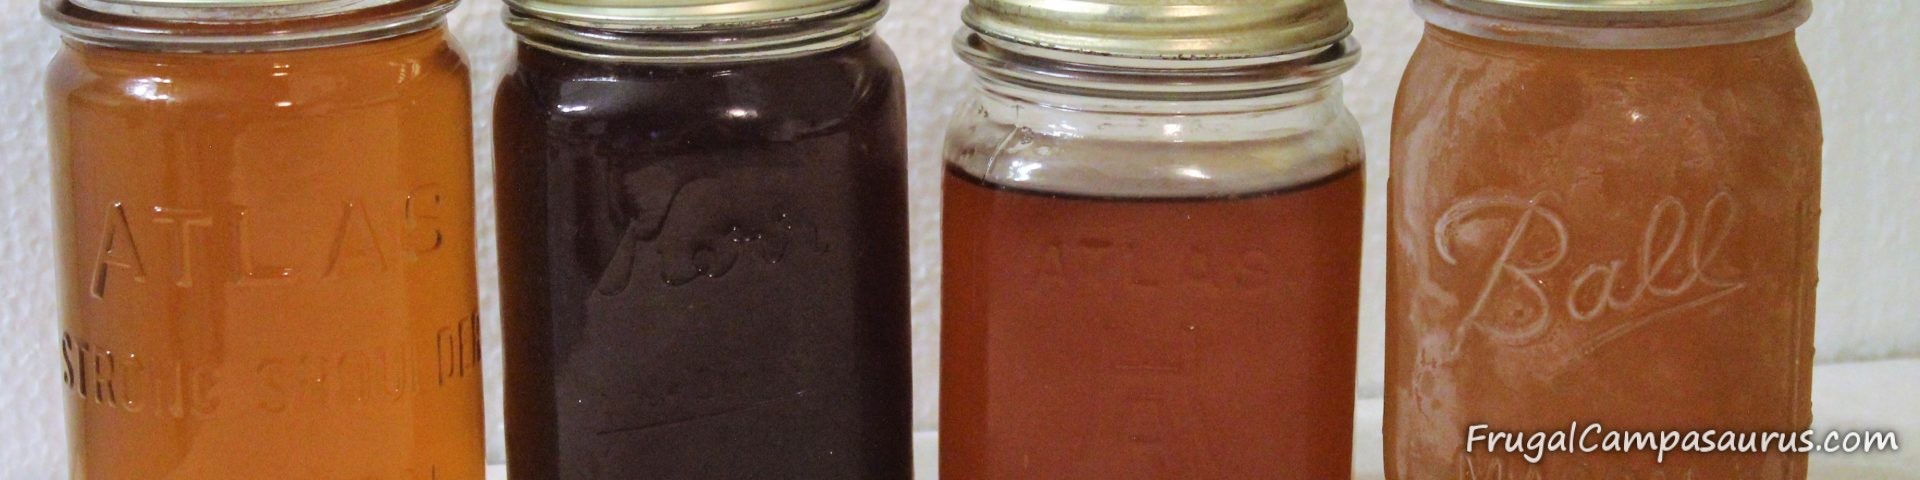
Once the maple syrup reaches temperature and is filtered the second time, we pour the finished maple syrup into jars and let them cool. Since we only tap 2 trees and don’t get gallons of maple syrup, I store the mason jars of syrup in the freezer.
Storing Maple Syrup
Canning maple syrup looks easy. The jars need to be sterilized, but you don’t do a water bath because it would reheat the syrup and cause more sugar sand to form. You do need to be more exact about the temperature and probably use a hydrometer, so you get the right sugar concentration and the syrup doesn’t spoil in storage. But, I’m a nervous canner.
Even when I can garden produce, I only use recipes from the Ball Canning Book or our extension service.
So even though it sounds easy to can the syrup, I would worry about the process and storage life. Since we only have 2 trees, our syrup fits nicely in the deep freeze until we want to use it. I keep a jar in the refrigerator and get out a new jar of maple syrup as one gets used up.
I am glad I can save money and use my mason jars to freeze our maple syrup. I leave ½ inch head space, just under the rings, in the jars and have not had a problem with expansion or jars breaking. Maple syrup doesn’t freeze- it just becomes really, really thick in the freezer.
Homemade syrup is thinner than some of the store syrups. One year, I decided to boil it longer and make it thicker. The syrup was thicker, but every jar had sugar crystals in the bottom. They were almost like rock candy and hard to chip out of the jars. Warming the jars in the microwave for a minute made it easier to chip out the sugar crystals. At least the crystals are sweet and yummy; they even taste good in my homemade granola.
Sometimes, I try hard to not make sugar crystals. Even though they are yummy, I wonder, since it’s thicker, if I get less syrup. So, I watch the thermometer very closely. One year, I thought I hit 219 degrees but, I evidently didn’t make it to the syrup point! Instead of just being cold and thicker, some of the jars in the freezer were partially frozen. The maple syrup was cloudy in spots and almost like slush. I could still put a spoon in the jar, but it was a different consistency than the other jars of syrup. It was fine and tasted good, though maybe a little thinner than normal.
This year, I am excited. It is almost maple syrup time and I have a few pints still left from last year. Even though we only tap 2 trees, I had enough to eat and make granola all year. I know production will vary every year, but I am going to try some new maple recipes this year!
End of the Season
The length of the maple season varies every year. We’ve had 2-3 week seasons and we’ve had 6 week seasons.
The weather and temperatures affect the end of the season just like it affects the beginning of the season. Once the temperatures stay above freezing at night, the sap will stop flowing. Also, as the temperature gets warmer and there is more light during the day, the trees bud and leaves get ready to open. This budding of the trees makes sap off-tasting and bitter.
I have a hard time telling when the trees are budding, since they are high in our trees. So, I watch for warmer temperatures and slowing sap at the end of the season. I have read that ‘buddy’ bitter sap smells ‘off’ as it boils, but I don’t think we have had any. We have dumped a few partial buckets of cloudy sap at the end of the season, but the temperatures were warmer and the sap flow had slowed. It was time to be done making maple syrup.
When the season is ended, the taps are pulled out of the tree. The husband uses the claw end of a hammer and pulls the nylon hose barbs out, trying to be careful with the bark. The hole may drip sap for a few days, but nothing is put into the hole. It will seal up on it’s own.
Getting Ready for Next Year
Our clean-up is probably different from most maple producers. Since we only have 4 taps and we use frugal supplies, we throw away the nylon hose barbs and the plastic tubing every year. I don’t like to waste, but thankfully it is less than $10 each year. If I cleaned the tubing and tried to save it, I would worry about the bleach solution strength, rinsing the tubes, drying the tubes and mold. So we buy new nylon hose barbs for taps and plastic tubing every year.
Milk jugs are rinsed as soon as the sap is poured into a cooking pan. They are dried upside down and reused throughout the season, but recycled at the end of the season.
Sooty stockpots or steamer pans are washed outside after every boil. At the end of the season, I wash the inside and outside of the sooty pans and buckets. Dawn dish soap and an old rag help get a lot of the soot off the outside of the pans, but they still don’t come in the house. I wash them outside and store them in an enclosed porch.
When we used the concrete block cooker, the rebar and grill grates were stored with the pans and buckets. With the barrel cooker, the husband dumps out the sand and stores the cooker in the shed to help prevent rust. With everything washed and stored, it is time to just enjoy the maple syrup until next winter’s maple season.
Maple Syrup Making Supplies
This list of maple syrup making supplies and frugal alternatives include Amazon links, especially so you can see pictures and examples. Since I am an Amazon affiliate, I do earn a commission from certain links. This does not affect your purchases or the price you may pay.
Many of our frugal supplies have been found at local hardware stores, bakeries- or already in our kitchen!
- 3/8 inch ID nylon hose barbs (there are many different hose barbs, but these are like the ones we get from the local big box home improvement store- they have the raised ring in the middle that the husband uses to pull out of the tree)
- 3/8 inch ID food grade plastic tubing , we usually buy 10 foot lengths
- stainless steel maple taps
- tree tapping spiles and tubing (included in a kit with a one quart filter)
- free frosting buckets or 5 gallon food grade buckets with lids
- milk jugs with lids, rinsed out
- large funnel, to pour sap from buckets to milk jugs for storage
- stock pots, we used 2 with the concrete block cooker
- deep, rectangle steamer pans, we use 2 with the barrel cooker
- cast iron, barrel camp stove kit
- pot holders, long handle wood spoon, small saucepan, fine mesh strainer (removing floaties and foam)
- cotton tea towels, we use for filtering or maple syrup filtering set, another option
- candy thermometer or hydrometer, to more accurately test for syrup-interesting, but I’ve not used one yet
- small,7-8 quart stock pot, a nice size when I finish boiling sap inside
- quart and pint mason jars, with lids and rings, for freezer storage of maple syrup
I’m so glad that maple syrup time is almost here-it is one of my favorite times of the year! Even though I wish we had tried making maple syrup sooner, I’m glad we tried. It is amazing how much we have learned, how much fun we have had and how much maple syrup we have made from our 2 maple trees! We have learned so much about backyard maple production from trial and error and from the internet. MapleTrader is a great forum for questions/answers and information on tapping maple trees, if you would like to do further research.
Hopefully, our frugal tips and syrup-ing adventures will encourage you to try making maple syrup in your own backyard!
Happy Camping (or tap, tap, tapping!)
Frugal Campasaurus